
| Part 1 | Setting up TFS Azure |
| Part 2 | Configuring Visual Studio to use TFS Azure |
| Part 3 | Registering Team Build controllers for TFS Azure |
| Part 4 | Builds in the Cloud |
Introduction
Continuing from Part 2, now that we have the essentials set up, we’ll take a look at how to utilize the full functionality of Team Foundation Server Azure.
Before we get too deep into the article – this from Microsoft:
5. Unable to configure a TFS 2010 build agent/controller
Unfortunately, the TFS 2010 build agent and controller is not compatible with the Team Foundation Service Preview. You’ll need to use the build server software that is part of the Team Foundation Server 11 Developer Preview. You can find information about that release here.
You’ll need to install a facet of the Team Foundation Server 2011 Developer Preview in order to configure a Build Controller and Agents.
Microsoft® Visual Studio® Team Foundation Server 11 Developer Preview is the collaboration platform at the core of the Microsoft Application Lifecycle Management suite of tools, which helps teams be more agile, collaborate more effectively, and deliver better software faster.
Anyhow, you’ll have to download the installer (choose from Web Installer, .iso or self extracting EXE). you could start downloading while continuing reading this article.
TFS Preview invite codes
I’ve had a few readers contact me in regards to invite codes for TFS Preview. AFAIK, I was able to help them all out; and I have a couple of code/activations (2-3) left.
So if you haven’t received your own activation code yet, and want to get started ASAP, drop me a line and I’ll send you one of the last codes I have which still has activations available.
Continuing Along
So when we left off, we’d configured Visual Studio 2010 to connect to TFS Azure, but now it is time to consume TFS Azure by using some of the functionality available. I’ve got a sample solution that I’ll be writing about and publishing in a later series of posts, and I’ll be using it as a guinea pig (test) of TFS Azure’s service.
Open the solution you’d like to manage under TFS Azure, connect to your TFS Azure account (follow steps in Part 2), and then add your solution to Source Control as you would for a normal solution. I prefer to add my solution structure to the source control directory before opening the solution. This makes it easier to bind.
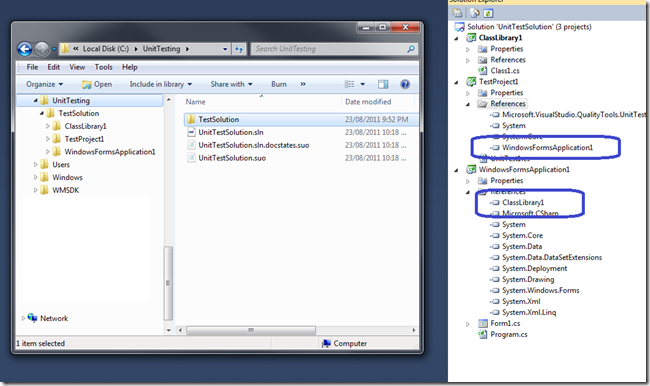
You can check your bindings, you should be able to bind:

Now, once the solution is opened, you’ll see that the files are pending in the source control window:

As a good developer always does, I’ve run my Unit Tests and ensured that everything is peachy:

Now that everything is ready, I’ll commit my changes to the Cloud!

Assuming all goes well, you commit should work successfully, and your solution is now hosted and bound to TFS Azure.
Building
Configuring automated builds, however, pose a tougher problem to solve. First, I tried to create a build definition myself, as I would with TFS 2010. I navigated my way to the Team Explorer window and right clicked on Builds and tried to create a “New Build Definition”:

This was met (predictably) with the following (somewhat unhelpful) error message:
“TF225001: Creating a build definition requires a build controller be defined for this team project collection.”

As mentioned earlier, and according to this known issues page – you’ll need to install the Team Foundation Server 2011 Developer Preview to define build and a build controller.
So, whilst we’re sitting pretty without our solution bound to source control, we can’t create continuous integration or other automated build definitions. A pickle.
Configuring a TFS 2011 Build Service
I’ll be the first to pose this question – what’s the point of Team Foundation Server Azure (in the Cloud) if build controllers and build agents don’t also sit in the cloud? It seems totally redundant to me, to go to the hassle of binding to Azure if I must create and maintain my own build controller and agents in what amounts to off-cloud hosting.
It is my hope that this is rectified sooner or later.
Nonetheless, moving on..
To set up a build controller/agent you can follow along here, watch Richard Hundhausen’s video or read BHarry’s post here.
Install
Once you’ve downloaded and mounted the TFS 2011 Developer Preview image, you’ll need to run the TFS Server install. I realise that a separate installer for the build parts would be *far* more convenient, but you have no choice in the matter, it seems:

Once the variety of prerequisites are preinstalled (including the ominous copying of installers to the dreaded “installer cache” you’ll be prompted with the following screen:

Configure Your Build Server
Since we’re only interested in the Build Service, select it from the left hand tree, and then click on “Start Wizard”.
Once you hit the welcome page, click “Next” ton configure your Build Service installation. On the second page you’ll have to select your Team Collection, you do this in much the same way as from Team Explorer (refer to Part 2 for details).


Once connected, you’ll notice that there are no build controllers.
Clicking Next, we’ll accept the default, and have a build controller and single build agent created for us.


On the next page, we’ll be prompted to provide credentials for the Build Service to run under. Note that you can change the default port that the service will use to communicate with TFS Azure (9191 by default). You might want to ensure you’ve opened the port with your firewall (or other systems). Don’t forget to click on the “Test” hyperlink to authenticate the credentials you’ve supplied.
Also note that the service will use the Windows Live credentials you specified when you connected to the Team Collection, earlier in the configuration steps, not the credentials you specify now, to connect to TFS Azure.

Our final page is the configuration summary page. Once satisfied that your configuration is correct, press the Next button:


Once the checks have completed, click on the “Configure” button..


Once finished, you should get (hopefully) all successes. Your Build Controller is now registered with your TFS Azure account.

Finally – A Build Configuration
Now that we’ve configured a Build Controller.. we can return to Visual Studio 2010. I refreshed my Team Explorer, then right clicked on the Build item and selected “New Build Definition”. This time, a different result – success.


Now I can configure my build as I normally would. For my first build, I’m not going to bother with a drop folder, so I unchecked this option (above) and also in the Process configuration:

Building
Now I’ve saved my build configuration, I’m going to run a test build. I right click on the build definition and select “Queue New Build”:


My initial build built, but failed the unit testing. This was caused by one of the tests which launches an interactive WinForm. Commenting out this form, and checking in, triggers the automatic Continuous Integration build. With luck, everything passes the second time:


Returning to our browser, if you log into your TFS console, ensuring you aren’t in the Administration section, you can browse and see the build history now:

Conclusion
TFS Azure represents a tantalizing option for teams to share their workspaces and automated builds, but until Build Controllers and Build Agents can be hosted in the Cloud too, build services are a major weakness. It is also somewhat disappointing that the Build Server software isn’t packaged and made available as a separate installation package (less than 1 GB).
That said, I had no trouble at all in configuring the Build Service 2011 (Developer Preview) and the whole process from Visual Studio 2010 to TFS Azure to Team Build worked seamlessly the first time through, with no errors or installation show stoppers.
In the next article, we’ll look at some ways we can customize the build as well as set some more meta data, such as Areas/Iterations and team security settings. We’ll also look at how we can link build definitions into our work items and how the registered builds play a part in our overall SDLC.
Check out http://www.tfspreview.com for more information, or the community message boards located here.
| Part 1 | Setting up TFS Azure |
| Part 2 | Configuring Visual Studio to use TFS Azure |
| Part 3 | Registering Team Build controllers for TFS Azure |
| Part 4 |


7 thoughts on “Team Foundation Server in the Cloud (Part 3): Builds, builds, builds”
In my experience build servers often require unique configurations and often additional supporting software to facilitate the build; so an out-of-the box build server is unlikely to work for most people.
I do think the build controller should be available by default and with no further install or configuration, but the build agents I see being most useful if made available as an Azure VM Role.
I don’t think it will be too difficult for microsoft to provide this as part of the Azure TFS service, rather than using a separate azure subscription to create the VM. But we will have to wait and see what route they take.
Test controllers and test agents are the area I would like to start seeing much more information on as the TFS Azure product develops.
I agree with this. I’m having to build my own vm for a build server now and it’s a pain. The new TFS build services seem promising but since you can’t customize them, I’m running into hurdles. Does anyone know the status of getting the ability to make changes to the standard TFS hosted build service?
Tom
Hi, if you have a tfspreview code left i would love to give hosted TFS a go!
I’d like to get a code and test it out with a new project, any chance you have a code left?
Thanks! Great post.
hi, nice post thanks, i know its too late to ask, do still left with any TFS Preview invite code ? i w’d like try for my WP 7 projects contest
Sorry! At the moment I’m clean out of invite codes, but I’m going to try to tap some contacts I have inside MS and see if I can get some extras.
I’ll be in touch if I’m successful.. Happy New Year etc.
Dear,
I am in need of an TFS Preview invitation code.
Thanks and regards,
Shan