Introduction
Following on from the earlier article which established a data schema, the next step is to wrap the database design in an ORM.. for fun.
I’m going to take a look at the latest pre-release of the Entity Framework, version 6 (RC1). If you’re interested in the licensing aspects, here’s a link to the licensing for V6 RC1. You must accept the terms before you can install the package.
Installing the Entity Framework v6 (RC1) via NuGet
In Visual Studio, create a Class Library project and then right click on the project in the Solutions Explorer and select “Manage NuGet Packages” option. You’ll be greeted by the following large dialog. Select ‘Online’ and then follow the next four steps:

- Change to include Pre-Release packages (default is to filter by Stable releases only)
- Enter “Entity” and press Enter to filter by keyword
- Verify that the result is the correct package (as of writing, Version 6.0.0-rc1)
- Click install, accept terms


Taking the Model-First approach
At this point you have a database and a data access framework. Let’s combine them!
On the Project in Solution Explorer, hit Add –> New Item. Select “Data” from the navigation and select “ADO.NET Entity Model”, providing a filename at the bottom.

On the next step, choose “Generate from a database” and then configure it to point to the data model we created earlier.


Next, you have to pick the schema items to include. Just include all the tables (which is all we have at this point anyway).
Here’s our generated model:

Modifying Join Tables
Notice something funny? If you didn’t pick it up right away, never fear – it’s not totally intuitive. In most cases the EF designer will model 1-many-1 relationships transparently if the join table is a basic table (just marrying PK:PK). I left an extra column in the CatalogSize join table to illustrate this problem.

To change the way the model is generated, simply remove the “Price” column from the target table, and regenerate the model. I had to manually delete the CatalogSize table from the model and then update to have the change reflected.

Fixing Up Self Joins
My schema design incorporates a couple of “self-joins”, where a table has a foreign key to another column in the same table. This can be used sometimes to establish a hierarchy, for example. I have two tables – and therefore two entities – that expose FK collections as “Navigation Properties”, they are Genre and Location:


As you can see, the naming isn’t all that helpful. You might ask – why are there two collections for one join? They represent both directions of a join, i.e. parent entities and child entities. To make it clearer, it’s a good practice to rename the properties so that the nature of the property is clearer.
But.. how do you figure out which one is which? The properties window doesn’t give much away (I thought if I recall correctly.. it might used to?), but there’s an easy way to find out the nature of each navigation property. Close the Model and reopen it with a text editor (right click on the model->Open With).

Search for the name of the properties, and you’ll find something like this:

As you can see from the above, the PropertyRef field gives you the side of the FK join that the named Navigation Property represents. Now we can rename:

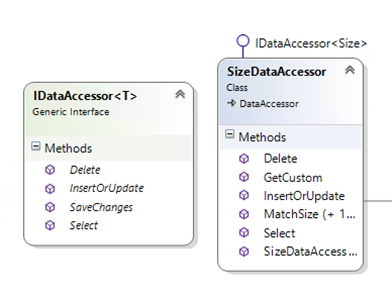
Adding a Data Access Helper Class
 My general preference for most ORM modelling is to avoid passing around the data context as much as possible. The main problem with passing around something like a DbContext (an Entity Framework base class) is that if the object isn’t properly disposed of when used, it can leave memory – or worse – DB connections – active until the garbage collector finally disposes of the object properly.
My preference is for queryable data (parameters for a query, objects to be updated) are passed to an abstraction layer where a context is provided for them. In previous versions of the Entity Framework this was achievable, by disconnecting objects from their source context, and “attaching them” to a new one when they needed to be updated.
However.. let’s take this one step at a time. First, let’s just select some data. I’m using a base class definition called ‘DataAccessor’ which is public, but marked abstract. I now have a class called ‘CatalogDataAccessor’ which is going to be the primary access method for data in the Catalog table.
Here’s the implementation of a very basic base class:
Since the primary table is the Catalog table, here’s another class which derives from this base class:
using System;
using System.Collections.Generic;
using System.Linq;
using System.Text;
using System.Threading.Tasks;

namespace RSPhotography.DataAccess
{
    public abstract class DataAccessor : IDisposable
    {
        protected RSPhotographyEntities _context;

        public DataAccessor()
        {
            _context = new RSPhotographyEntities();
        }

        public void Dispose()
        {
            if (_context != null)
            {
                _context.Dispose();
            }
        }
    }
}
using System;
using System.Collections.Generic;
using System.Collections.ObjectModel;
using System.Linq;
using System.Text;
using System.Threading.Tasks;

namespace RSPhotography.DataAccess
{
    public class CatalogDataAccessor : DataAccessor
    {
        public ReadOnlyCollection<Catalog> GetAllItems()
        {
            return _context.Catalogs.ToList().AsReadOnly();
        }
    }
}
That’s all we need to do for now, because I want to show you how powerful Entity Framework entities really are.
Writing a Unit Test
Add a Unit Test project to the solution, and add a Reference to the Class Library you added at the start (which contains the EF model).

Rename the default test to something nicer, and don’t forget to copy across (or soft link) the App.Config file from he Class Library project. You’ll also need to add the Entity Framework package, although you already have the package in the solution, so this really just causes a binary reference to be added.
using System;
using Microsoft.VisualStudio.TestTools.UnitTesting;
using RSPhotography.DataAccess;
using System.Diagnostics;

namespace RSPhotography.UnitTests
{
    [TestClass]
    public class BasicTests
    {
        [TestMethod]
        public void TestGetData()
        {
            using (CatalogDataAccessor access = new CatalogDataAccessor())
            {
                var result = access.GetAllItems();
                Assert.IsTrue(result.Count > 0,                               "Should be at least one record");
                Trace.WriteLine(result[0].Title);
                Catalog first = result[0];
                foreach (Location loc in first.Locations)
                {
                    Trace.WriteLine(loc.Title);
                }
            }
        }
    }
}
What this basically does, is retrieve data from the database, and if all goes well, you should be able to validate the first Catalog entity returned, and then interrogate the “Location” entities associated with this entry.


Summary
So at this point we have:
- A working SQL Database project which can build the schema and load reference and test data post-deployment,
- Imported the Entity Framework v6 RC1 NuGet package into the solution,
- A data access project which contains a working Entity Framework data model,
- A unit test project which can execute some basic queries
You should be able to blow away the database and re-establish it fairly easily at this point. I’m including my “work in progress” at this stage, if you’d like to have a play with it. I’ll go into far more depth in upcoming articles, this is a bit of a baby steps approach to introducing an end-to-end scenario.
Here’s matching solution files for this article [ Solution Files ]
A note about the sample – you’ll have to re-add the Entity Framework NuGet package as I excluded it for license and file size reasons. Fastest way is to delete the entry in one of the project’s packages.config file and then re-add through the NuGet package manager.
Check back soon for the next article in this series, where we’ll pad out the solution and show how to edit and delete entities.