
Introduction
It is important to understand what a network load balanced cluster is and what it does. The cluster is made up of member hosts, and each host is bound to a public IP address (or addresses) which resolve to the cluster itself.
Each host in the cluster must have Network Load Balancing installed, and bound to the network interface(s) of choice.
When you initially install the cluster, you configure both an initial member host, and then the cluster settings. This can be a little confusing at first! After the cluster is created (with a single member host) you then add additional host members separately.
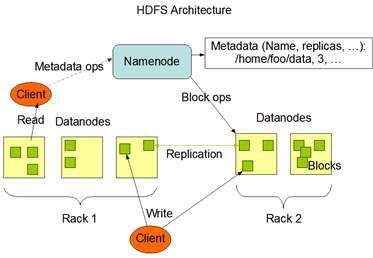
An example Network Load Balancing Cluster:

Note how each host in the cluster has a network interface card which is bound to the cluster’s IP address (10.2.194.100).
What follows is a set-by-step guide to installing and configuring a Network Load Balancing cluster on Windows Server 2008 (R2 x64). You’ll need to be (at minimum) a local Administrator on each machine which will participate in the cluster, to install and configure.
Installation and Configuration
1. Install Network Load Balancing
Open Server Manager, click on Features and then click on the Add Features link. In the “Add Features Wizard” scroll to, and select “Network Load Balancing”:

Confirm and install.
2. Start Load Balancing Administration

3. Create a new Cluster
Right click on the root tree element on the left hand column marked “Network Load Balancing Clusters” and select “New Cluster”
1. For Host, enter the computer name (or IP Address) of a host to add to Network Load Balancing
note: Network Load Balancing must be installed on this machine beforehand!
2. Select the interface on the machine you wish to configure for NLB (you might have more than one) – click Next

3. Give the Priority to the host (it reflects the priority order for the host in the cluster). For the initial host, you might leave it as 1 (the highest priority) – Click Next

4. Cluster Configuration (not host-specific!)
Add a public IP address which will be resolved to the NLB cluster
You will have this address bound to each of the selected interface(s) of hosts in the cluster – i.e. multiple hosts will be configured with a static binding to the IP address(es) of the cluster IP address(es).


You may bind the cluster to a specific host name (or leave it blank). You can have multiple IP addresses for a NLB cluster (I’m using just one).
On the last page, you may configure port rules (which ports are routed by the NLB, on the specified cluster IP address(es))

Clicking finish will see the cluster created for the specified host you selected at the beginning. If for some reason, there are errors, you can simply bind the selected interface of a host to the public IP address of the cluster yourself, manually, and then just refresh/”start” the host again.
Here is an example of a configured NLB cluster:

The final piece of the puzzle might be to add a DNS record to allow us to resolve resources which are Network Load Balanced with a nice friendly URI:

Troubleshooting
If you get the error message "NLB not bound” on a cluster host, access the host machine and simply add the cluster’s IP address(es) to the selected interface on the machine manually:

You might also need to review the firewall settings on each cluster host, to ensure that traffic is reaching each host as expected.

4 thoughts on “Establishing Network Load Balancing with Windows Server 2008 R2 x64”
…so if we want to setup 2 x NIC’s per host, one for client traffic and one for cluster traffic, how do we tell NLB to “exchange heartbeats” on the cluster nic???
It should do that by default, because the cluster NIC will have the cluster address bound to it.. Are you seeing the heartbeat being sent via the client NIC?
Thank you.. was helpful and had to select multicasting.
As unicasting doesnt work with single network adapter!!
Worth mentioning you will need to enable MAC Address spoofing (Hyper-V) if your NLB servers are to be VM’s