Last week I had a disk corruption which proved to be somewhat catastrophic. My main server had an apparent corruption of the Directory database, and even after I’d run a system restore, still could not bring Active Directory back up. To cut a long story short, my journey would have ben far shorter if I’d had a backup directory sitting on some cheap hardware. This brings me to my new solution..
Are you looking for a low cost computing option, but feel constrained by the hobby nature of the smaller options like the Raspberry Pi? What if you could pay a bit extra and get something with a genuine Intel 64bit processor and support for mobile architecture hardware? If this sounds like you, you might want to try the Gigabyte BRIX.
Specifications
I’d read about these little “workstations in a box” last year, they blazed the trail for small footprint machines. For a reasonably low price, these tiny boxes which almost fit in the palm of your hand (your hand size may vary) pack a powerful punch.
| CPU | Intel® Celeron J1900 4 Core Up to 2.4GHz (1.99GHz realised) |
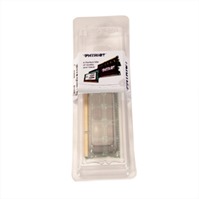
| Memory | Patriot 1333GHz 8GB SO-DIMM |
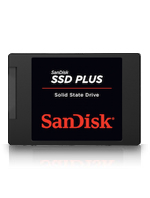
| Disk | SanDisk SSD Plus 128 GB SSD |
Check out the detailed specs (note that the CPU range scales from i-series Intel to Celeron) – my version is the GB-BXBT-1900 [1] which features a dual core Celeron:
- I’m using a SanDisk SSD Plus 128GB 2.5” SSD [3]
- I’m using Patriot 1333GHz 8GB RAM [4]
The BIOS supports UEFI secure boot for Windows 7 and Windows 8.1, but you can disable secure boot and install via IDE configuration to get other OSes onto it. Apparently you can run Windows 10 on one, but I have not attempted this just yet.
Installation
When you purchase a new BRIX, it comes without a hard drive and memory, i.e. buy these separately. Once you’ve unboxed your shiny new BRIX, you’ll need a small screwdriver to undo the base of the box to access the internals. Installing the HDD and memory is trivial if you have only the slightest modicum of experience with electronics or laptops.
Once you’ve got your HDD and memory seated and connected, screw the base back on (making sure that the “This Side Up” instruction is pointing the right way!). All you need to do now is plug the BIRX into a monitor, and perhaps a keyboard and mouse.
I’ll cover the BIOS and OS installation in a separate article. Here’s a nice link to a PowerShell script you can use to dump OS and hardware info.
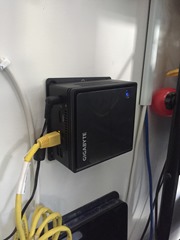
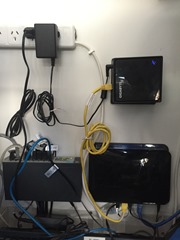
Once you are happy with the OS configuration, it’s entirely possible to run the BRIX “headless” (sans monitor, keyboard and mouse). My intention was always to sit it near the network switch, and courtesy of the VESA mounting plate, it was trivial to wall mount:
You can see the BRIX relative to the Router (bottom) and the HP switch (bottom left). All that’s required is the ethernet cable and power. It is now my little DMZ environment!
Links
- [1] http://www.gigabyte.com/products/product-page.aspx?pid=5118
- [2] http://ark.intel.com/products/78867/Intel-Celeron-Processor-J1900-2M-Cache-up-to-2_42-GHz
- [3] http://www.sandisk.com/products/ssd/sata/ssd-plus/
- [4] http://www.patriotmemory.com/product/detail.jsp?prodline=10&catid=34&prodgroupid=248&id=1339
- [5] https://gallery.technet.microsoft.com/scriptcenter/Powershell-Script-to-get-b716c3f4





7 thoughts on “Introducing a Gigabyte BRIX solution”
I’m planning to get one to put it to work as a database server for a local hobby web application.
I’m curious if the SoC would handle the load, as the SSD would most likely be up to the challenge (read/write operations).
At the moment I host the DB server and some nonstop worker processes on a Raspberry Pi, so most likely this would be an improvement
But i’m curious to see what’s your opinion after some usage with this box. Have you experienced disappointing load issues ?
Hi Andrew,
At the moment, I’m using the Brix as a RDP ‘jump box’ and also to control some IPCams using iSpy, so it hasn’t been incredibly CPU or disk I/O heavy.
I was considering doing some perf testing to see how it responds to higher load. The CPU will likely be the weakest link, but you can get Intel i-series processors in the Brix range, which will doubtless help with the CPU performance. One thing to be mindful of (potentially) is heat – I don’t know how hot it’ll run, but there’s very little inside to manage heat from what I can see.
Cheers,
R
Hi Rob,
I have been debating in purchasing one of these and have done a bit of research on them. Many users, especially Linux users who try to run these headless, have complained that since Gigabyte updated the BIOS’ on these systems, running the system headless is no longer possible. If you do not mind stating, which BIOS version you are running, if you updated the BIOS since you received the system and continue to run the system headless. Seems anything above version F3 (no longer available) have had issues running the system without a monitor attached.
I see that Gigabyte’s latest BIOS is from 03/02/2016, but only state “Fix win10 hang up issue.” Other than that description, Gigabyte does not provide what other issues if any the BIOS upgrade resolves. I am required to run the system headless, so your feedback is much appreciated in assisting me in determining if this is the right system for me.
Best,
Thomas
Hi Thomas,
I’ll have to check the current BIOS level. I eventually moved the Brix inside and re-purposed it as a media box as I was given a headless Dell server for free. However, when I did run the Brix headless, I ran Windows Server 2012 R2 on it rather than Windows 10, and I had issues with UEFI boot, and had to change the BIOS to boot legacy instead.
R
Thank you for your reply Rob.
I went ahead and purchased one and struggling with the UEFI boot. Windows 8.1 Pro installed , each time the system boots, I get the EFI Shell. Not good when running headless. Should you have time, can you provide how you went about in changing the BIOS to boot in legacy mode instead? I did try to change ACHI to IDE, but then Windows hanged and would not boot. Maybe a re-installation is required. Changing back to ACHI Windows repaired itself and booted fine. Since this is a fresh install, I want to be able to just boot directly into the OS and move on to becoming headless. So maybe legacy and a fresh reinstall might be the route I will have to take. So, when you have time, if you can provide the BIOS setting to do legacy, I would be much grateful.
Thanks again,
Thomas
Hi Thomas,
That’s the route I had to take. Switch to IDE and install from a USB .iso. Haven’t had any issues using this config.
R
Changing from ACHI to IDE in the BIOS and doing a fresh install of Windows resolved the issue. I hope others that have the same issue will be helped by these comments. Thank you for the assist!!!
Best regards,
Thomas